New Collection: The Secret Door

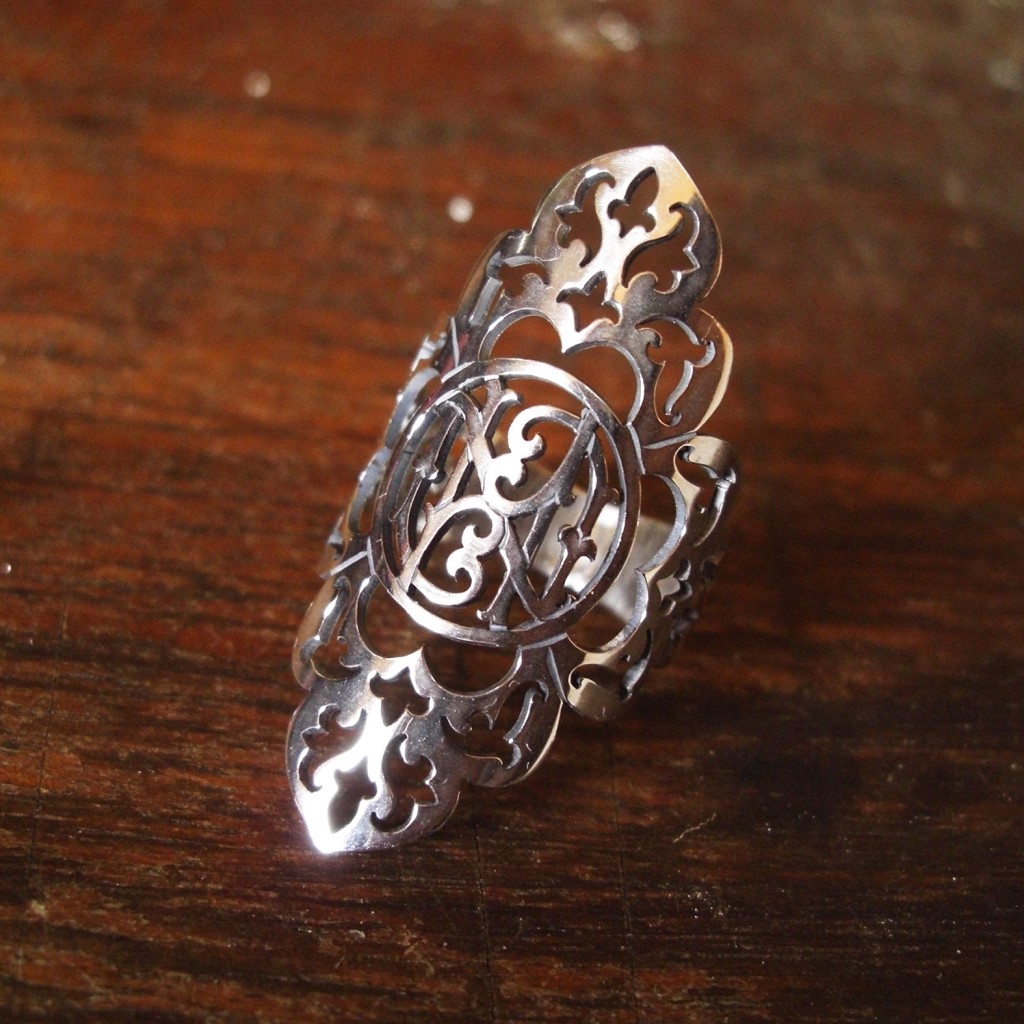
Knock knock! Who’s there? The new Secret Door collection! Inspired by an ornate hidden antique door overgrown with ivy, these Victorian flourish style jewels all have a swinging ring which makes a lovely tinkling sound as you move.Small and sweet, the new range features a miniature floral door knocker as earrings, a necklace, a ring and the signature piece; a letterbox locket. Secret Door Ring Hand pierced from 100% recycled sterling silver, the arabesque style ring has a wide band and low profile for every day comfort. The ornate detail of the flourish on the front and cut outs on the side give the otherwise broad ring a delicate look. The swinging door ring is wonderful to fidget with and makes a lovely tinkling noise to emphasise your hand gestures. Secret Door Earrings The silver earrings are suspended by two fine chains in order to create even more movement in the escutcheon and therefore more lovely tinkling from the door ring. Secret Door Necklace The Secret Door pendant has as elegant simplicity which makes it delightfully versatile. This is the kind of necklace you could wear all day at work and still leave on when you go out at night. Secret Door Locket The letterbox locket is the signature piece of the Secret Door collection. Post a little note or photo to yourself hidden from the view of anyone else. For the full range see the Skadi Jewellery Design store
How to start saw piercing
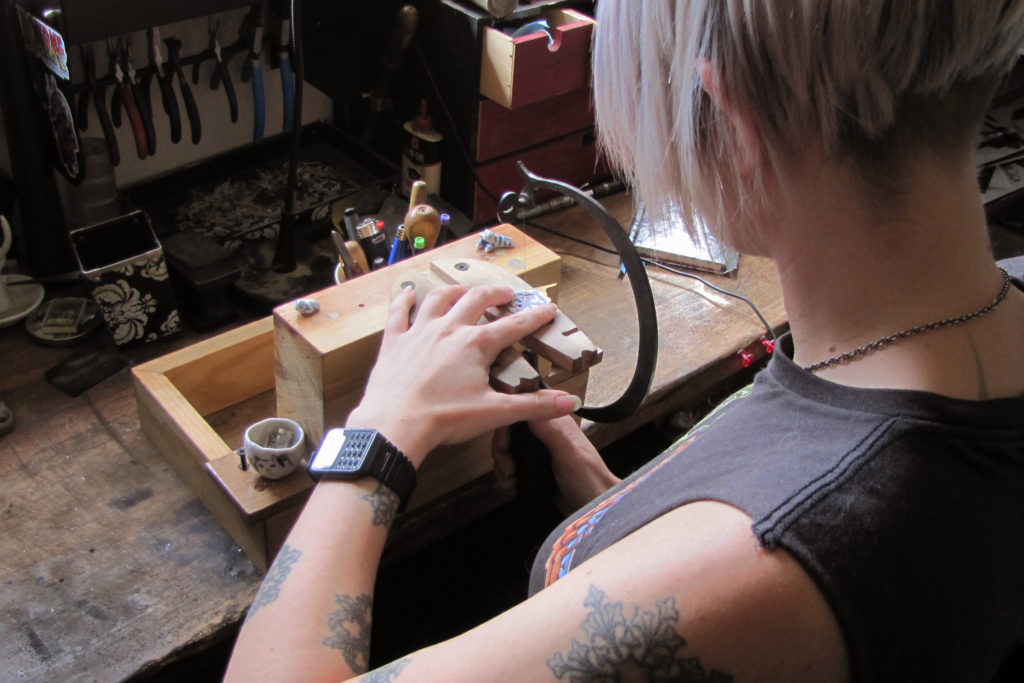
Would you like to learn how to saw pierce metal in order to make your own jewellery? Follow this beginner’s guide to saw piercing to get started with a valuable skill which requires minimal tools and expense. Like many people around the world right now I’m staying home in an effort to reduce the speed of the spread of coronavirus. For me that means having a lot of spare time I never imagined having and I intend to make the most of it! Apart from actually taking the time to relax occasionally with a book, I’m hoping to learn some new skills and give myself the chance to be creative. Knowing that so many of you are in the same boat I wanted to share some of my knowledge and experience in saw piercing.Usually I teach these skills in an in person workshop where I can guide the students, share tips and tricks, answer questions and help them refine their technique. Unfortunately written instructions will never be as thorough, but hopefully my basic guide below will help you get started. Whether it leads to an afternoon of amusement or starts you on the journey to being a sawing master, I encourage you to have a go! A beginner’s guide to saw piercing Choosing the Right Sawblade Thickness of metal vs intricacy of design When deciding which blade to use for a piece, it’s important to consider a number of things. While it can often take trial and error to get just the right one, understanding your materials and design makes it a lot easier.Thicker sawblades are more resilient and will cut through metal faster, but they remove more material and don’t turn easily. The thicker the blade, the further apart the teeth. This makes them most appropriate for thick metal or very simple designs that don’t feature high detail, tight corners or small compartments within the design. Thicker sawblades are a poor choice for thin metal as the teeth will often get caught.Thinner sawblades, by comparison, are much more accurate and easier to control. They’re ideal for very intricate, highly detailed designs, but they break easily and cut more slowly through thick metal. Choosing the Right Frame Sawframes Different sawframes are suited for different jobs. A sawframe with more depth (the space between the blade and the parallel back edge of the saw) is ideal for cutting larger pieces of metal, but doesn’t offer a lot of accuracy, as your eyeline will be further from the metal whilst cutting. A more shallow sawframe will offer more control on smaller and more elaborate pieces, but may have difficulty cutting long straight lines. Loading the sawblade If a blade is stretched too tight, it will break easily. If not tight enough, it won’t cut effectively or accurately and is also more liable to break. When loading the blade, first ensure the teeth are slanting downwards toward the handle of the sawframe. Place the top of the blade into the top clamp of the sawframe and tighten the screw. To get a good blade tension, gently push the top of the frame against your bench while placing the bottom of the blade into the bottom clamp of the frame and tightening the screw. Preparing the metal Selecting the right metal thickness for the job As thinner metals are easier and faster to cut through, they’re usually the most enjoyable to work with – not always the most appropriate though! Metal with a thickness of 0.3 – 0.5 mm is great for incredibly intricate designs and any jewellery for which weight is a necessary consideration (such as earrings.)0.6 – 0.8 mm thickness works well for things like pendants, which require structural integrity without being too heavy. For rings, metal with a thickness of 0.7 mm+ is more appropriate as they tend to get knocked about the most. If you have a very intricate design which needs more structural integrity, layering is a good way to avoid compromising your design without adding hours to your making time. Simply cut out your detailed design in thin sheet then rivet or solder it to a thicker sheet. Applying the design There are two main methods of applying a design to the surface of your metal so you have lines to follow. The first is to lightly engrave your design onto the metal then cut it out. This works well if you just need to cut out a basic shape, but for a more complex design you may find yourself going a little cross-eyed trying to focus on the fine and often subtle engraved lines. If you don’t follow the lines perfectly, you may also find yourself spending a long time sanding out the engraving lines from the surface of your metal.For lines with a higher contrast which are easier to follow over a long period of time, sticker paper is the way to go! You can draw your design onto the sticker paper, cut it out and apply it straight to the metal, giving you an easy and accurate guide to follow. Sticker paper is also great if you have a design which you’d like to duplicate as you can simply print multiple versions. Drilling holes If you have compartments within your design which need to be cut out you’ll need to drill holes through which you can thread your sawblade. You shouldn’t need a drill bit any larger than 1mm, as sawblades are nice and small. Additionally, a smaller hole will take less time to drill and reduce the risk of drilling into your design. If the interior section of your design features a sharp point within the compartment try to put the hole close to it – this will be the best place to start cutting.When drilling, make your action smooth and decisive. Being slow and apprehensive is a good way to break drill bits! If you’re drilling a thick piece of metal you may need to drill halfway through, withdraw, and then
Someone Ate the Cuckoos Clock
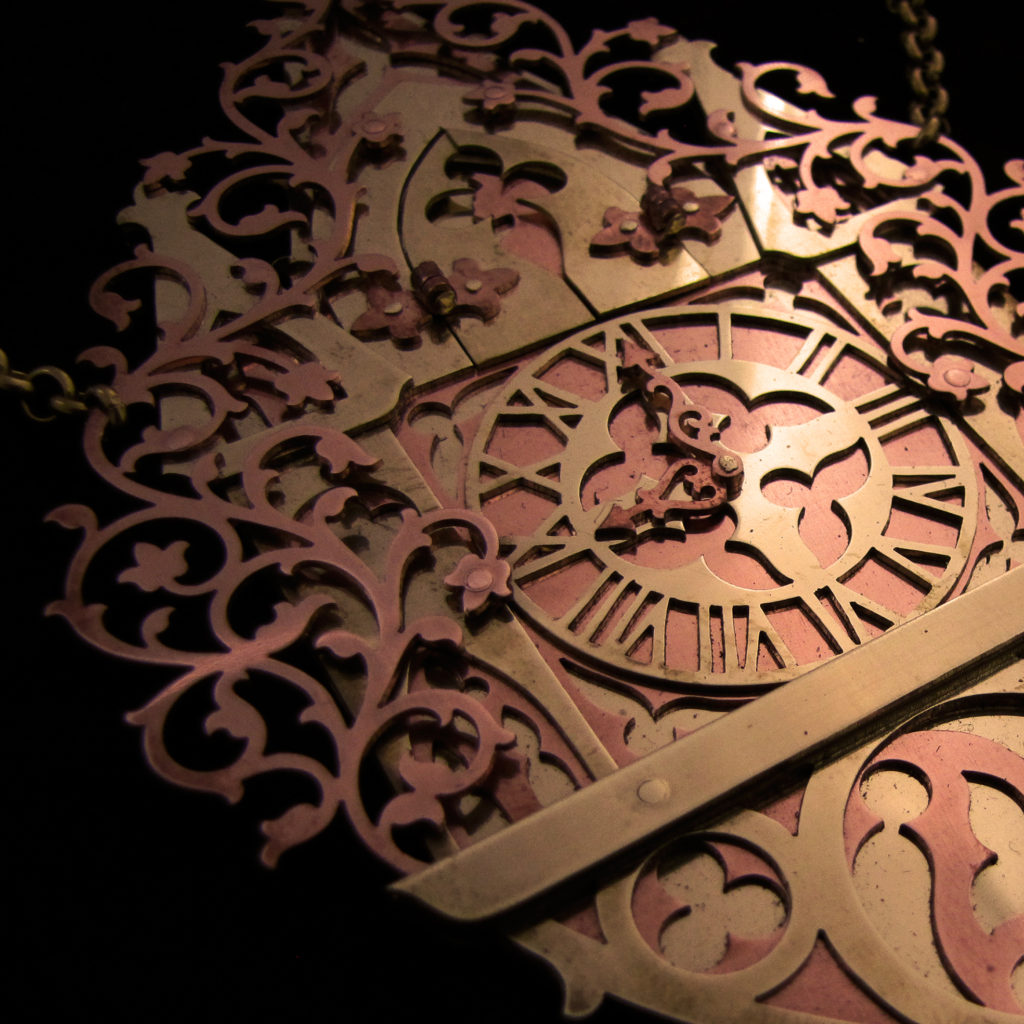
When I was asked if I’d like to create a piece to feature in in.cube8r gallery’s Self Care exhibition alongside some incredible Melbourne artists, I figured it was the perfect excuse to make the time to create something just for myself. It’s a rare occurrence and if I’m honest, more than a little intimidating to have no boundaries, but a wonderful opportunity nonetheless! ‘Self care’ is a meditation on what it means to perform self care. We have invited creatives young and old, experienced and emerging to discuss the ways that they use art as a form of self care. Some works are unfinished, unpolished and imperfect, some created specifically as a means of discussion.in.cube8r gallery Time really does fly when you’re making art. My meditation takes a slightly different form to others’. When I’m saw piercing I can finally relax and let my mind wander. This piece in particular was a source of refuge amongst a stressful few weeks. Whenever I could find a spare minute I’d look forward to working on it and take a moment to enjoy what I was doing. Apart from the process itself I also tried to pack in as many features as possible which calm my mind and give me pleasure; playful kitties, beautiful architecture, overgrown ivy and a sense of times past. I also love hidden elements so I couldn’t pass up the opportunity to put a third cat behind the doors above the clock face where the cuckoo usually sits (hence the name of the piece just in case you missed that 😉 ). ‘Someone Ate the Cuckoos Clock’ consists of over 15 hours of drilling, saw piercing, assembly and riveting. Although it looks rather complicated and detailed, when you break it down into the component pieces of each layer you can see there’s mainly just a lot of cutting involved (which for me is the relaxing part). I deliberately designed the piece to only require processes and techniques which wouldn’t cause me any stress! So as you can see I was only using the most basic tools and cold forging (no soldering needed!).Just using brass and copper also kept the material costs low so it doesn’t matter whether or not I sell the piece (they also happen to add a certain warmth which I find appropriate). Having absolutely no concern for what anyone else thinks of the piece is a wonderful feeling. The main aim of this purely decorative non-functioning clock was that every process involved would be an enjoyable one, from the design to the construction and even it’s display. In that regard it was a complete success. I’m currently working on some everyday pieces inspired by this exhibition piece. If you’d like to see the latest updates follow me on Instagram and if you’re in Melbourne head along to in.cube8r gallery before September 25th to see the piece in person!
Custom Labyrinth clock
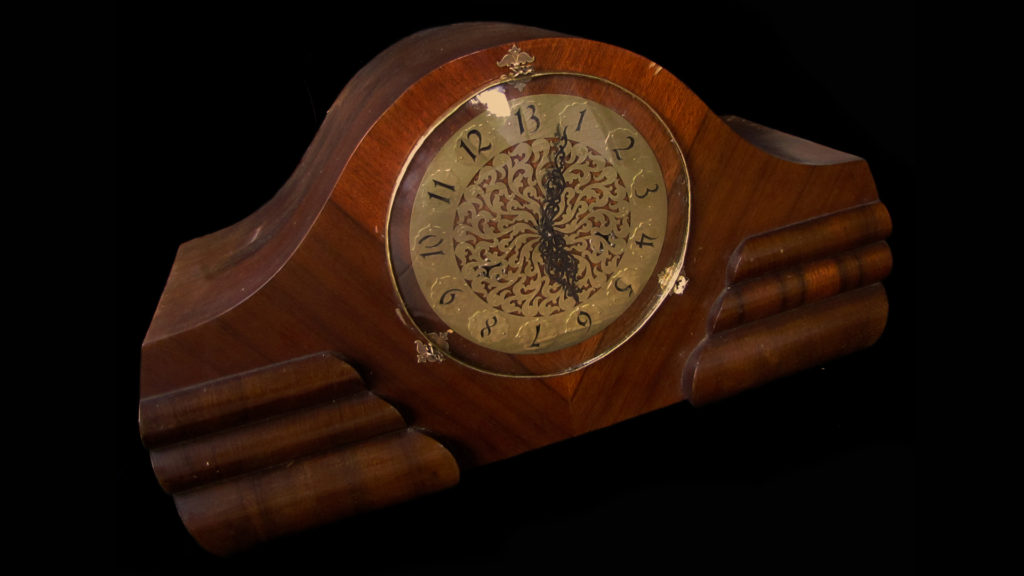
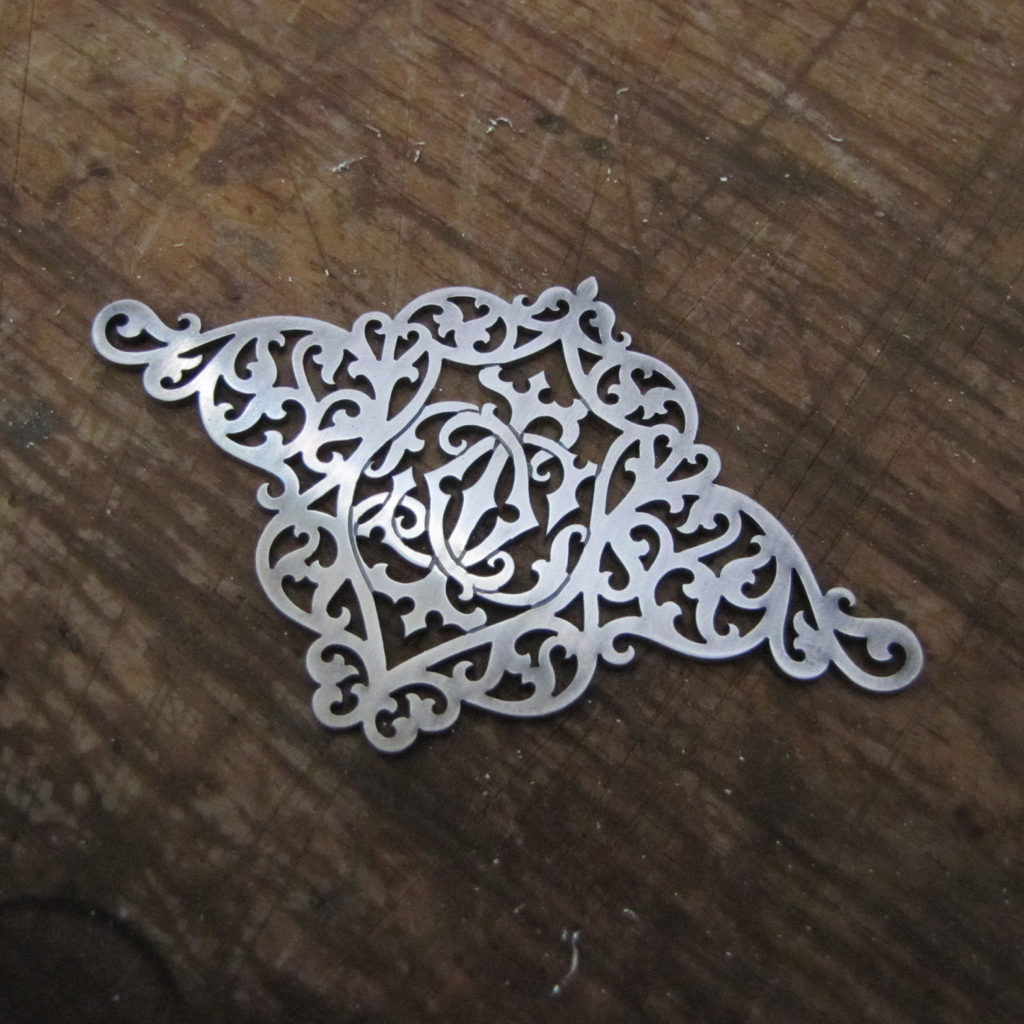
I made a clock!…Well sort of.A little while ago one of my lovely customers came to me with a fairly ordinary Art Deco clock. As it turns out they happened upon it when it started chiming early one morning from inside one of the walls of their house! How it managed that feat after decades being buried without being wound is anyone’s guess. When they unearthed the clock it even still had the original warranty from 1948 hidden inside! The warranty was for 5 years by the way so I’d say it’s doing alright.While it was still in pretty good condition the face was a little sad and plain so they came to me for a facelift! Being a huge Labyrinth fan they wanted the design to be inspired by the Baroque style clock from the movie which has 13 numbers rather than 12. Obviously with 13 hours rather than 12 the clock could no longer be functional which made the design process a little easier for me. I may enjoy the aesthetics of a lovely antique clock but I have to admit the mechanics are beyond me.In order to fit the existing shape of the clock I designed the face to be a simple circle where I could go to town with intricate detail inside (and this being the first time someone has given me the opportunity to make a clock face I really did get carried away). After making sure the client was happy with the design it was time to get sawing! After hand piercing the face to get an abundance of scrollwork, I engraved a few details into the brass to define the features. I then cut out the numbers, hands and the elements which would hold the glass in place. After riveting the numbers to the face I painted both the hands and the channel created by the cut out numbers with black enamel to make them stand out. It was then just a matter of shaping the elements to hold the glass then nailing both them and the face to the wooden base with little brass rivets.The result is a curious amalgamation of styles and time periods I hope has given this clock enough life to get through another seventy years! If you’d like a custom piece of your own fill out the custom request form and I’ll get back to you ASAP!
Workshop: initial pendant
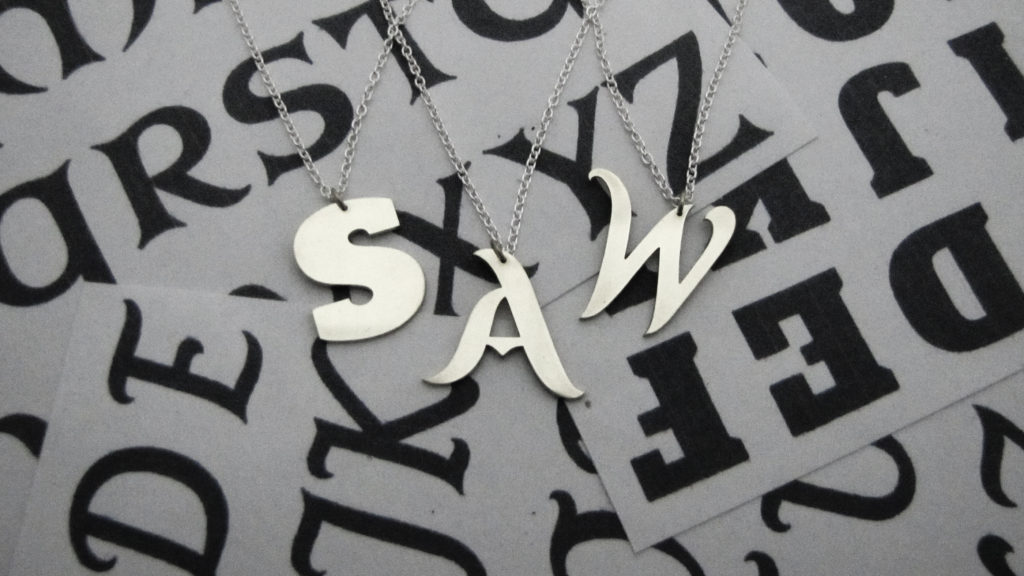
Learn how to saw sheet metal to create jewellery from scratch In this jewellery making workshop you can learn how to use a jeweller’s saw to cut out shapes from sheet metal (either brass or silver depending on your preference) to create an initial pendant from scratch. 3 different alphabet designs will be available so you can select the style which appeals to you! You will also be provided with a silver chain so you can walk away already wearing your creation.Whether you’ve never picked up a saw frame before or you’d like to take your technique to the next level this workshop has you covered! All required tools will be provided but if you have your own favourite saw frame, pliers or files feel free to bring them along! Material costs which include brass sheet, silver sheet and chain, as well as sawblades and sandpaper are included in your ticket price. Meet your tutor Clare Davidson graduated from Curtin University of Technology with a Bachelor of Arts – Jewellery Design in 2008 where she discovered she loved making jewellery even more than she loved wearing it. In her final year at University Skadi Jewellery Design was born. Using silver, brass and leather Clare loves to create works of art which appear as delicate as lace with the strength of metal. Almost every day from her first day of university over 14 years ago until now, Clare has been hand piercing intricate designs and takes great joy in passing on her thousands of hours of experience to help inspire other people. Very few people realise that when done correctly, saw piercing can be a form of meditation and Clare believes that’s a message worth spreading! When and Where Date: July 14 2019Time: 4:30pm – 7:30pmVenue: in.cube8r gallery Prahran – 116 Greville St Prahran, Victoria 3181 TICKETS For all the latest workshops click here
Workshop: Saw Pierced Earrings
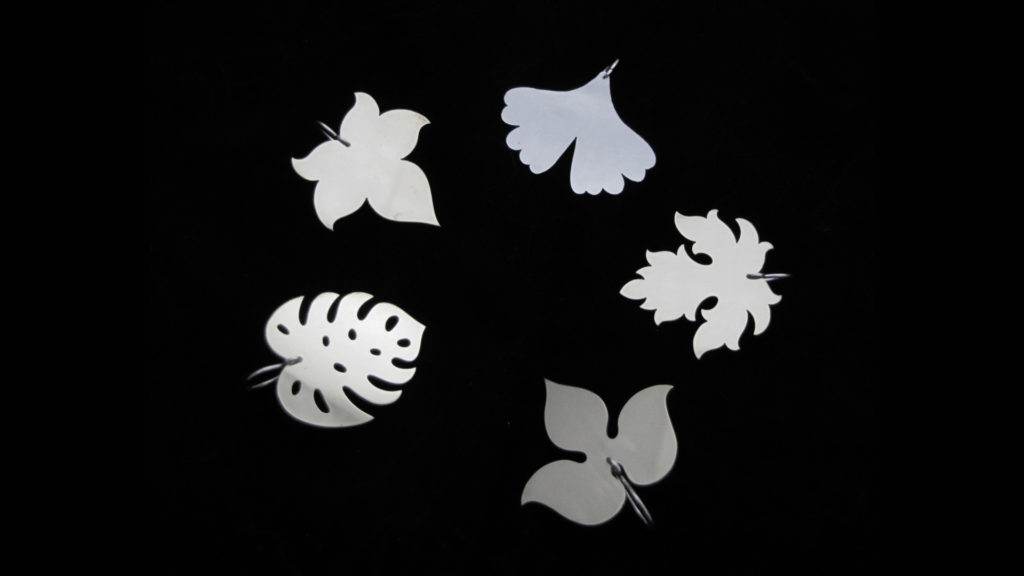
Learn how to saw sheet metal to create jewellery from scratch In this jewellery making workshop you can learn how to use a jeweller’s saw to cut out shapes from sheet metal (either brass or silver depending on your preference) to create a pair of earrings from scratch. 5 different leaf silhouette designs will be provided which cater to all skill levels. Whether you’ve never picked up a saw frame before or you’d like to take your technique to the next level this workshop has you covered! All required tools will be provided but if you have your own favourite saw frame and pliers feel free to bring them along! Material costs which include brass sheet, silver sheet and wire, as well as sawblades and sandpaper are included in your ticket price. Meet your tutor Clare Davidson graduated from Curtin University of Technology with a Bachelor of Arts – Jewellery Design in 2008 where she discovered she loved making jewellery even more than she loved wearing it. In her final year at University Skadi Jewellery Design was born. Using silver, brass and leather Clare loves to create works of art which appear as delicate as lace with the strength of metal. Almost every day from her first day of university over 14 years ago until now, Clare has been hand piercing intricate designs and takes great joy in passing on her thousands of hours of experience to help inspire other people. Very few people realise that when done correctly, saw piercing can be a form of meditation and Clare believes that’s a message worth spreading! When and where? Date: May 24Time: 12:00 pm – 4:00 pmVenue: in.cube8r gallery116 Greville Street, Prahran, VIC 3181 Australia TICKETS For all the latest workshops click here
Designer Toy World Cup
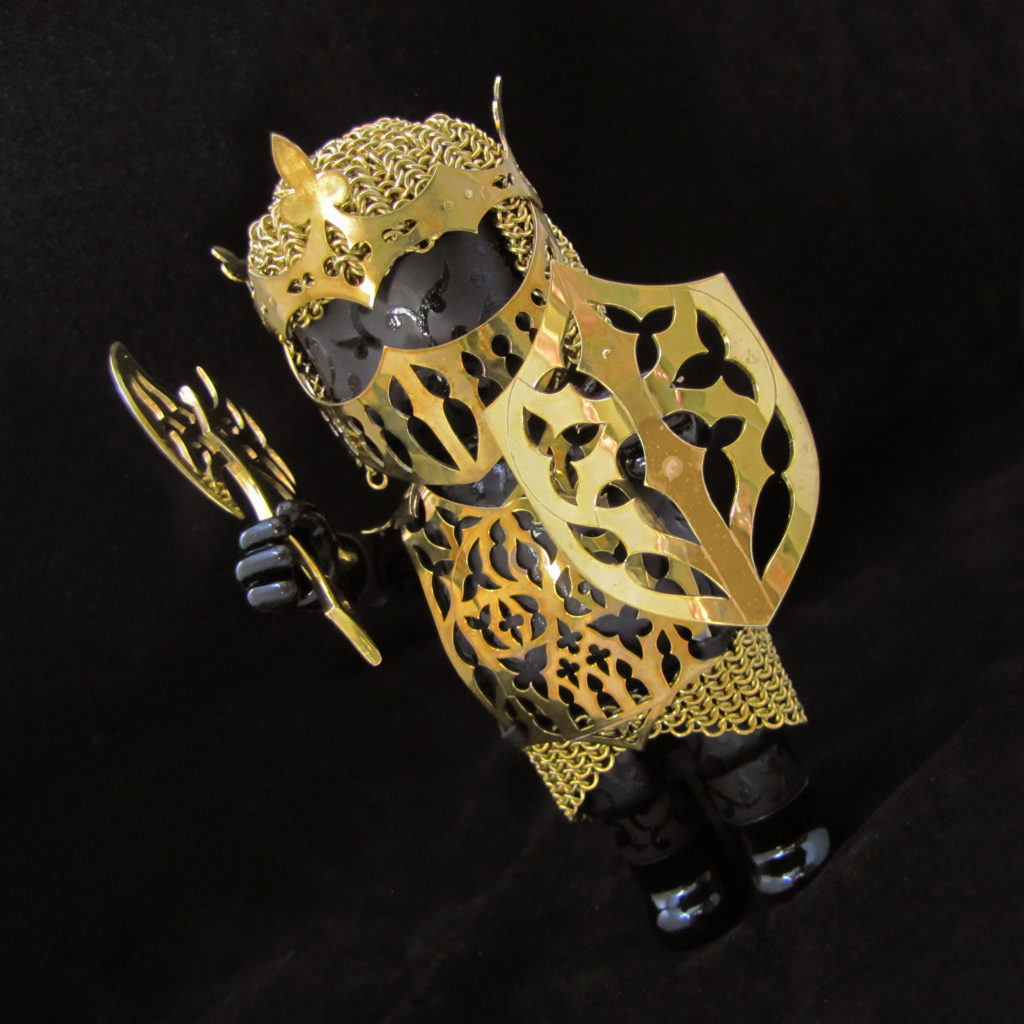
When I was invited to create an entry as part of Team Australia for this year’s Designer Toy World Cup it came as a bit of a surprise as I’ve never made or decorated an art toy before! But never one to pass up an opportunity for a fun art project I accepted with relish. Obviously I severely underestimated the amount of time it would take me but that’s par for the course as I tend to get a little carried away when given free rein. When transforming my little DIY Bobby I wanted to stick to what I know best; metal. So it seemed like a no brainer to me to give him a suit of armour. Sir Bobby was born. From the very beginning I envisioned Sir Bobby as some kind of demon warrior king so I designed his armour in a Medieval Gothic tracery style, complete with a skull motif subtly worked into the breastplate. This guy isn’t messing around.I hand pierced everything including axe, shield, breastplate, epaulettes, crown and visor from brass sheet and did a little bit of hand engraving to pick out the necessary details. After shaping the flat metal to the contours of Bobby’s body and riveting the pieces together, my knight was in need of some chainmaille to protect his precious little vinyl head and thighs. Now this is where I may have mismanaged my time somewhat. Making each little link from scratch I went through metres of brass wire and gave up a solid chunk of my life to fashioning his coif and skirt. Worth it. https://www.skadijewellery.com/wp-content/uploads/2019/05/sir-bobby-finished_Medium-1.mp4 Sir Bobby was starting to look like he was spoiling for a fight but he wasn’t quite tough enough for my liking. Obviously he required head to toe tattoos. To match his armour and emphasise his slightly supernatural aspect, I painted Bobby with some medieval style foliage. I lightly pencilled the design all over his body then carefully painted it in black so it was just visible. I then went over it in a gloss topcoat to give the contrast of the glossy vines on the matte black body. Even though most of the painting is hidden by his armour, I like that you catch occasional glimpses of it through the holes. Sir Bobby was then ready for assembly and his trip to NYC to join all the other Bobbys! I hope he plays nice. The competition begins June 1st 2019 at the Martian Toys booth at Five Points Festival in NYC. If you’re close by check it out! If not you can see all of the incredible the entries here:@martian_toys@designertoyworldcup@redlife1972 https://www.skadijewellery.com/wp-content/uploads/2019/05/sir-bobby-finished_Medium.mp4
How a Skadi Jewellery Design ring is made
Do you want to know how a Skadi Jewellery Design ring is made? If you’re anything like me you’ve probably lost a significant portion of your life down the vortex that is ‘how is it made?’ videos. I recently watched a feature length film on the making of a brass sculpture in which not one word was uttered, it simply showed the process from beginning to end. I was mesmerised. This post is for those of you who share my fascination. It all starts with a flat sheet of sterling silver and a design; in this instance a personalised monogram ring with the initials DJC. I print my design onto some adhesive paper and stick it to the silver sheet. A small hole needs to be drilled into the negative space of every single cell which needs to be cut out. In order to cut out the enclosed cells of the inside of the design, the blade in my saw frame needs to be released on one side, threaded through a drilled hole, then fastened back into the saw frame. As you can imagine this a time consuming business for every cell! https://www.skadijewellery.com/wp-content/uploads/2018/01/VID_243900604_164922_605.mp4 Once the design is entirely cut out I can remove the adhesive paper to magically reveal the shape of the ring to come! I hand engrave some carefully calculated lines around the monogram to add the details required to distinguish each letter and have them stand out from the frame. The silver then needs to be annealed (heated up) with a torch to make it more pliable. This way I can then bend it around a ring mandrel to create a basic ring shape and solder the two ends together at the back. I then put it back on the mandrel to hammer it into a perfect circle. From there it’s just a matter of a good sand and polish and it’s ready to wear! Not including the time it takes to design the piece, a ring like this can take 3-5 hours. I hope that knowing how much time and effort goes into the making of the rings on your fingers gives you an even greater appreciation for their beauty! Of course there are hundreds of different ways to make a ring but I hope you’ve learned something from my process of choice. If you have any questions or you’d like to know how any of my other pieces are made don’t hesitate to leave a comment. If you’d like a personalised monogram ring of your own follow check out the listing below or fill out the custom request form. If you’d like to see more of my jewellery making process check out my instagram. commission your own monogram ring
Skadi Ambassador – Dragonfly
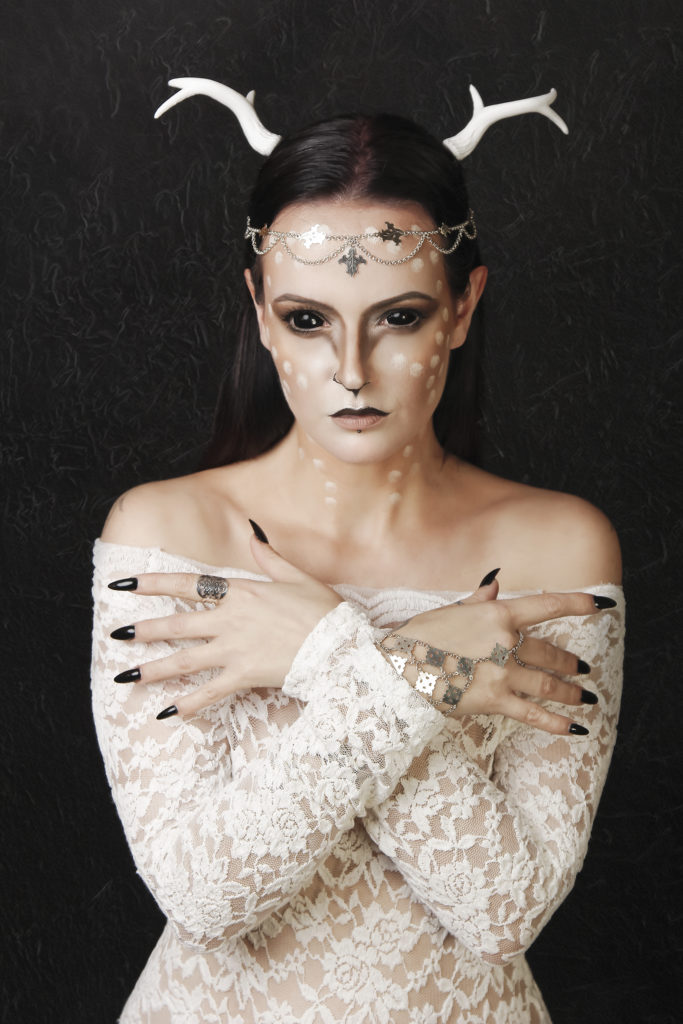
Skadi Jewellery Design has a new face! And as you’d expect it’s clever, creative and very attractive. I have had the pleasure of collaborating with the wonderful Dragonfly for 2 years now so I am delighted to announce that she is the new Skadi Jewellery Design brand Ambassador! She has essentially held this role the entire time we’ve worked together by continuously representing my jewellery in spectacular new and creative ways, but it’s nice to make it official.I’m so excited about our future partnership as Dragonfly shares my love of characters and stories but adds a whole new enchanting perspective. I believe we’ll inspire each other to some truly extraordinary fantastical creations! Dragonfly (real name Margarida or Gui to her friends) is based in Portugal and has been working as an alternative model for the past 10 years. In that time Dragonfly has represented some wonderfully talented and well respected artists and brands such as Alchemy Gothic, The Gothic Shop, Vilindery, Burleska and Curiology. She is also an exceptionally talented photographer and is responsible for all of the styling and make up involved in her work. A genuinely creative and versatile Jack of all trades, this is one woman worth keeping an eye on! You can find more of Dragonfly’s amazing work here: Blog Instagram Facebook
Making a ring video
Usually when someone sees my work for the first time their initial question is inevitably “how is it made?”. More often than not people assume all of my work is laser cut (who would be mad enough to cut out such small details for hours a day right?). Even after all these years I still get immense pleasure from the look on people’s faces which range from pleasant surprise to downright disbelief when I tell them I make all of my metal pieces myself. When I mention I often make the chains myself too they look at me like I’ve just told them I’m Elvis. Immersed as I am in my work I often forget that not everyone knows exactly how jewellery is made. Thanks to the brilliant photographer Nelli Huié who put this video together (and rather masterfully condensed 3-4 hours of work into under 2 minutes), I can finally show you how one of my custom monogram rings is made from start to finish. Enjoy! P.S. If you have any questions about the process please don’t hesitate to post a comment below! https://www.youtube.com/watch?v=R3_knm_5rmQ&t=4s Order your very own custom monogram ring

